
Elizabethan Effigy Bodies (A Tale of Rabbit Trailing)
Rabbit Trailing
verb
The act of bouncing from one topic to the next, abandoning the previous topic to pursue the next in a meandering way.
You know how every now and then you just get a bug and can't stop thinking about it, and have to do the thing? Then you get excited about the next thing and have to do that? That happened to me last winter. I began my winter sewing plans on a VERY different track: I wanted to do a cute little red dirndl with a white apron and little snowy accents for a Santa Walk bar crawl, so I spent a bunch of time researching dirndls which lead to historical bodices which lead to comparing different historical eras to discern which techniques would work best for this style and then somehow I ended up sidetracked by Elizabethan bodies. I tried to refocus on my little dirndl, but she has sadly gotten pushed to the wayside because I kept drawing and doodling these. Then, as life happens, I got distracted by something else. And I haven't been able to pick back up until recently. This little outfit has been sitting in my "current projects" box for too long, so we're picking it back up! I want to have it for THIS winter at least.


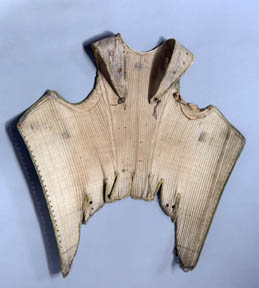
Images of the effigy bodies, front, back, and on a form.
There are two extant examples of this particular kind of undergarment from the late 16th century. The Dorothea Bodies and the Elizabeth I Effigy Bodies. I went with the effigy bodies for a few reasons.
1. I don't like the tabs on the Dorothea Bodies. The boning ends at the waistline, with tabs sewn on ostensibly for comfort and to attach skirts and things to. This set up isn't uncommon to see on garments from the period, but in my experience it is significantly less comfortable than having fully boned tabs to spread the pressure of the garment out a little bit.
2. I had just started watching Elizabeth I on BBC and just want to do all things Elizabeth.
3. The unboned bust area looked like it wouldn't offer the kind of support I prefer to have in an undergarment. I imagine it would give a slight curve to the silhouette, which may actually be very pretty, so I'll probably try it on another garment. For right now, though, I'd like to really achieve the conical look of the time.
MAKING THE PATTERN
Honestly, I winged it with the pattern a little bit. I looked at a few images of the bodies and started sketching out what kind of shape i'd need.I draped some paper on my mannequin in roughly the right shapes, and drew out where it looked correct. Looking back, I should have shifted the back seam inward a smidge, and created a slightly more defined bodice line at the front of the armscye. Oh well, it'll still be a nice shape, if the neckline is a little low and soft.

LINING AND STITCHING THE MAIN BODY
I cut three very historically inaccurate layers for this - a cotton flannel shell, a denim interlining, and a cotton broadcloth lining. All of these things were going to be for other projects (specifically my little winter dirndl. there should still be enough left to make that bodice, as well) Before sewing the pieces together, I pad stitched/basted the interlining to the shell. That will give it a little bit more stability and help keep the lining and shell from slipping while i'm adding the boning channels.

After stitching all the interlining and shell pieces together, I folded over the seam allowance and pressed it flat. Then I whipstitched the pieces together. I lined the bodice with matching cotton broadcloth.


PLEATING THE SKIRT
Cartridge pleating a bazillion yards of fabric is, surprisingly, one of my favorite things to do. I love the ZZZIP feeling of pulling the pleats into place, and the careful, zen quality of measuring multiple lines of stitching out to the same length. It's quite cathartic.
Also, I am the worlds laziest cartridge pleat-er, and I don't measure and mark my pleats. I know, I know. I use my thumb and eyeball them, and it totally works. I'll bet you the women making their own skirts back then did the same thing.

Until Next Time
And that's where we've left off! I still have to do several things to finish these pieces:
Stitch the rest of the boning channels on the bodice
Creating lacing holes at the center front
Attaching the skirt to the waistband
Hemming the skirt
The longest part of that will definitely be adding the bone channels by hand, but I think that will be a good meditative project once I get all my stressful LoJ projects done!